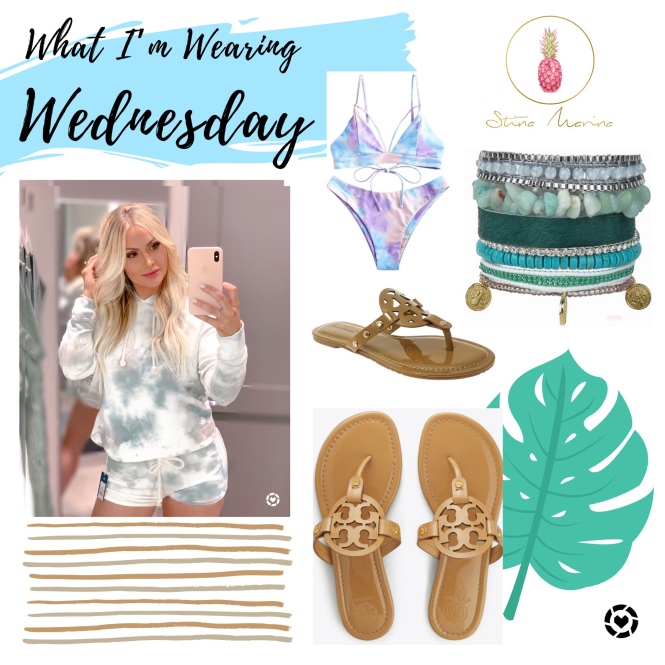
Finally breaking out of my loungewear to jump on the tie dye trend, incorporating it into pieces I’m a little more comfortable with: swimwear (…and loungewear too, I won’t lie..)! Living in Florida, I spend a lot of my weekends over the summer in a bathing suit and a cover up, so I try to keep them cute and trendy. For the pieces I find myself wearing year-after-year, I tend to splurge a little bit more and stick with more neutral colors and looks. I have had a few pairs of sandals that have lasted and looked brand new for years! They are comfortable and go with virtually everything. If you’re not looking to spend the money, there are some awesome dupes out there that I’ve linked as well!
A great pair of sunglasses and a few bright accessories like these turquoise bracelets can be worn to style up your poolside look or with your casual outfit of the day.
Find more ideas and favorites by following me on LikeToKNOW.it and Instagram!
DIY projects can seem a bit intimidating, but these DIY farmhouse shutters were easy and affordable at under $100! Special thanks the The Home Depot for helping us get the precise wood cuts and selecting the proper materials and finishes to achieve our desired look.
A little backstory to these shutters: as Jeff and I have been slowly renovating our property, we began to realize that one of the walls really just needs some more detail and something to achieve some visual balance. Naturally, the first place I turned to was Pinterest to gain some inspiration and found that a set of decorative farmhouse shutters would do the trick! I did a quick search of pre-made shutters, some of them showing results for $800+ per pair — yikes. Finally circling back around to Pinterest I realized, “this is probably something we can do ourselves!” so I did a little more research, hyped up my husband and off we went to begin our DIY adventure.
You will need:
6” x 1” pressure treated boards — amount of boards and length of boards depend on your specific measurements
Cement screws — 2.5” x 1/4”
Masonry drill bit to drill through block
Medium grit sand paper
Wood stain of your desired color
Polyurethane top coat
Spray paint to match the wood stain
Small piece of cardboard
Soft towel for stain application
Small paint brush for stain and polyurethane application
2 people are required for assembly and and mounting
Here is the stain and the polyurethane finish we used: STAIN — POLYURETHANE
LET’S GET STARTED!
Take measurements of your window and decide what shutter dimensions would look best. It is easiest to pre-determine the amount of wood needed and ask to have the pressure treated boards cut on-site — this is easy, efficient, safe and provides you with quick accuracy.
Reminder: when working with pressure treated wood, give it a few days to dry out prior to working with it since it can shrink and crack around screws you immediately drill. Once the wood is ready to work with, make sure to pre-drill all of your holes prior to screwing the boards together!
First, take the screws and secure them into the small piece of cardboard by puncturing through it so each screw is standing upright. Spray paint each screw with a rich coat of paint and let dry as you work on your assembly plan for each shutter.
Next, grab your pre-cut boards and lay everything out. Get a visual for how you want the shutters to look: pay attention to the knots and grain pattern of each board and arrange them in the fashion you like. Take photos for reference!
Begin to sand down each piece of wood with the medium grit sand paper. Then, you can either begin to apply the wood stain and then assemble the shutter or assemble the shutter and apply the stain. Either way, determine where you will need to screw things together and pre-drill some holes first! Use the spray painted screws to harness the boards and blend into the stain. We actually assembled and then stained, which in hindsight made it a bit more difficult to get into the cracks and crevices between each plank, so you may find it easier to stain the boards individually prior to building.
Apply the stain with a small soft towel and use a small paint brush to help cover the nooks and crannies. Wait 12-24 hours between each coat of stain, it may take anywhere between 2 and 4 coats depending on how rich you would like the stain to appear. Finish with a polyurethane coat to protect the boards and let dry.
Now that your shutters are built, stained and dried, it’s time to hang them! This part definitely takes two people. Using a level, measuring tape, and a good eye, mark where you need to drill into the wall to hang and secure each shutter. We used a 2.5” x 1/4” cement screw with a masonry bit to drill through the concrete. One person should help to hold the shutter steady while the other drills and secures it to the wall.
Once secured, take a step back. Recheck your measurements and plans to place the second shutter and then get to work. All that’s left to do after this is to enjoy your new DIY farmhouse shutters!